Options / Settings
Quick Links
Introduction
The options screen allows you to customise the Download Player and make any
configuration changes you may need, for example selecting a sound card. The
channel number and name is always displayed above the page selection on the top
left of the screen.
Channel Selection
You may select the channel that you want to change the setting for by scrolling
through the channels using the left or right buttons at the bottom left as shown below.

Note: You must click Apply to save any changes before changing the channel.
The options section is split into a number of different sections. An explanation
of each of these sections and the settings/options within each section can be found below.
Advanced Options
Please note that by default not all of the sections detailed below are shown. At the
bottom left of the screen you should see the Show Advanced Options tick box.
You may need to tick this to see all of the options detailed.
Channel Options
Channel Name - The channel options display the name of the channel as
programmed by the management system. If you need to change the channel names for any
reason please contact your media consultant or account manager, contact details can
be found by logging into the
https://www.musicstylingonline.com
web site.
Channel Icon - You may also select an icon for the channel by clicking the
Browse button. Some icons may be provided automatically by the system, but you can
copy your own images into the images folder in the application directory (by default
this directory can be found at C:\Program Files\DownloadPlayer\Images\). Once you
image(s) are in this directory, you can browse to them, using the Browse button as
mentioned above.

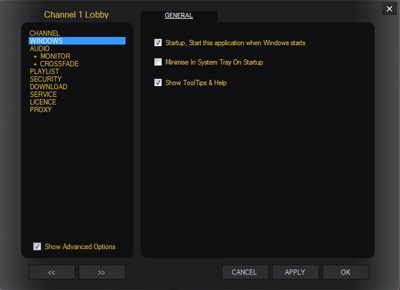
Windows Options
Start this application when Windows Starts - The Download Player
will add a shortcut to your program start-up menu so each time windows loads the player
automatically starts.
Minimise In System Tray On Start-up - The Download Player will minimise itself
to the windows system tray at the bottom right of the windows task bar. When the
Download player is minimised in this way, you can view the player by right clicking on
the icon in the system tray and from the menu that is displayed select the Show option.
Show Tool Tips & Help - It this option is ticked, when you hover the mouse
over certain items within the Download Player, such as buttons and menus, you get a
description of what that item does in a tool tip. These descriptions make the system
easier to use, as you can easily find out what each function does.
Audio Options
The Audio Options allow you to select what device you want to use to output the
music from your Download Player, control which channels are used and normalise the
music.
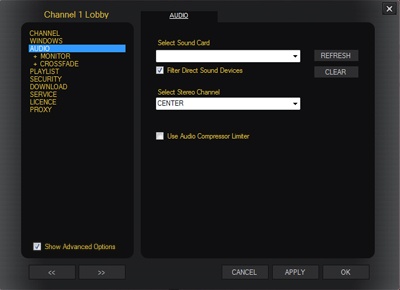
Select Sound Card - This informs the Download Player which soundcard to use
to output each channel's music.
For single channel players the system automatically selects and uses the default
sound device as chosen in the Windows Control Panel.
In multi channel systems you must specify each channel's sound card by selecting
it from the drop down list.
Filter Direct Sound Devices - This allows indirect sound devices to be selected
from the Sound Card drop down list above. Tick/un-tick this box, then press the
Refresh button to re-load the options within the Sound Card drop down list.
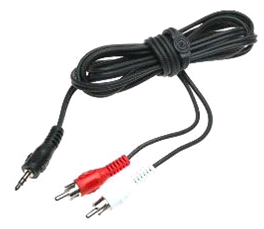
Select Stereo Channel - By default the system will select the CENTRE from this
drop down list. However you may use the same sound card to create two mono channels
from one stereo output. To do this, specify LEFT for one channel and RIGHT for another.
To split the audio you will need an audio cable that splits the output in to 2, normally
a 1.25 inch stereo jack (connects to soundcard) to 2 mono 'phono' connectors (connects
to sound system) like the one below.
Use Audio Compressor Limiter - The system will use a plug-in to normalise the
audio output on the fly. This will help to keep the volume of each track at the same
level and prevent one track suddenly playing much louder than the others.
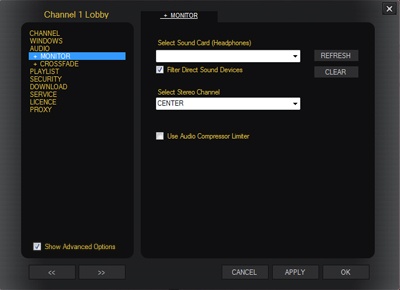
Audio Options (Monitor)
The Audio Options (Monitor) settings allow you to select what device you want to use
to output the preview of music (usually via headphones) from your Download Player.
Note: These are not the settings used for the main output of your Download Player,
just to preview a track before it plays.
Select Sound Card - This informs the Download Player which soundcard to use
to output each channel's track preview.
You can specify each channel's preview sound card by selecting it from the drop down list.
Filter Direct Sound Devices - This allows indirect sound devices to be selected
from the Sound Card drop down list above. Tick/un-tick this box, then press the
Refresh button to re-load the options within the Sound Card drop down list.
Select Stereo Channel - We advise you select CENTRE, as if you are using headphones
to preview the music this will allow playback through both Left and Right channels on the
headphones. However you may use the same card and specify LEFT for one channel
and RIGHT for another to create two channels from one stereo output.
Use Audio Compressor Limiter - The system will use a plug-in to normalise the
audio output on the fly. This will help to keep the volume of each track at the same
level and prevent one track suddenly playing much louder than the others.
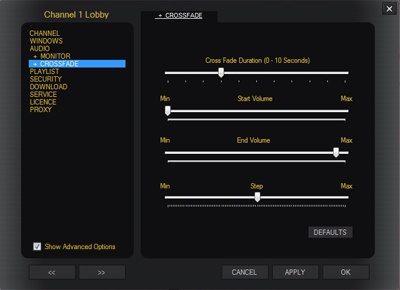
Audio Options (Cross fade)
The cross fade settings allow you to control what happens as one song comes to the end and
the next song starts.
Cross fade Duration (0 - 10 Seconds) - This setting controls the period of time
taken to fade the song that is finishing into the next song in the playlist. If it is
set to 0, then cross fade is disabled and there will be the slightest of pauses between
the tracks; like you usually get on a CD. The higher the setting, the longer it takes
to blend the two tracks together.
Start Volume - When the Download Player cross fades two tracks, you can
select what volume you want the second track to start at. If you select the minimum
volume, then the track will fade in from silent to the level of the End Volume set.
The higher the start volume, the louder the volume level that the second track will
start playing at.
End Volume - When the Download Player cross fades two tracks, you can select
what volume you want the second track to end at. The higher you set the end volume,
the louder the playback of the music will be. The end volume is the volume at which
the rest of the track will play for after it has been cross faded in.
Step - This is the 'smoothness' of how the two tracks are blended together
during the cross fade The higher you set the step, the smoother the tracks will
blend together.
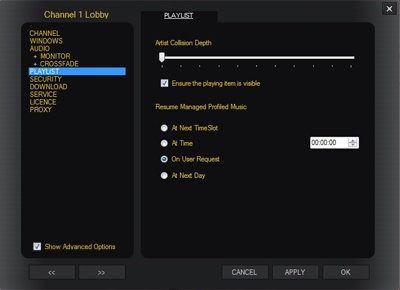
Playlist Options
Artist Collision Depth - The Download Player can be configured so that a
song by the same artist won't play within a certain number of tracks of another
song by the same artist. This setting is the minimum number of songs to be played
between two tracks by the same artist to be selected. Set at the minimum setting,
Artist Collision is disabled. The maximum number of songs that can be set is 10.
Ensure the playing item is visible - This setting (if ticked) forces
whichever track is currently playing to be visible in the playlist on each of the
Download Player's channels. This makes it easier to find the current track in the
playlist and to access the next tracks in the playlist, but it may prevent you from
scrolling up/down to view tracks that are a distance from the current track in the
playlist.
Resume Managed Profiled Music - By default, the Download Player plays the
playlists that have been scheduled to play at certain times of the day; within it's
timetable. For example, a morning playlist may be scheduled to play between 5:00am
and 11:59 am, then at 12 noon an afternoon playlist will load.
At any time, the user can override which playlist is playing by selecting the
profiles tab within the required channel's section of the Download Player, right
clicking on a profile and selecting Play Profile. If this is done at any time,
then the scheduled playlist is overridden with the selected profile's playlist.
Using the previous example at 12 noon the afternoon playlist needs to know if to
start or not.
This setting allows you to tell the Download Player when to "Resume it's
timetabled playlists".
The options are:
-
At Next Time Slot - In the example above the next time slot
is scheduled at 12 noon, so at this time the playlist will automatically
change back to the timetabled playlists.
-
At Time - The Download Player will revert back to the timetabled
playlists at whatever time you enter.
-
On User request (Default) - This options will keep the user
selected playlist playing until the user requests to resume the timetabled
playlists. This can be done by selecting either the Playlist or Profile tab
from the Channel's main section within the Download Player, then right
clicking in the left window on the page and selecting the
Resume Time Table option.
-
At Next Day - The timetabled playlists will resume the following day
(i.e. at midnight).
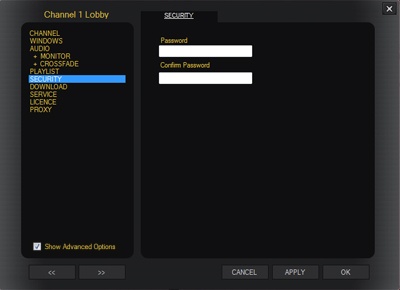
Security Options
Password - You may set a system password so that once locked the Download
Player will prompt the user for a password in order to access any of it's functionality.
To lock the system press the lock (padlock) button on the channel interface screen.
The system will automatically lock if left unattended. When the user attempts to re-access
the player they will be asked to re-enter the password first.
Confirm Password - Re-enter the password entered in the Password box to
ensure you have typed it in correctly.
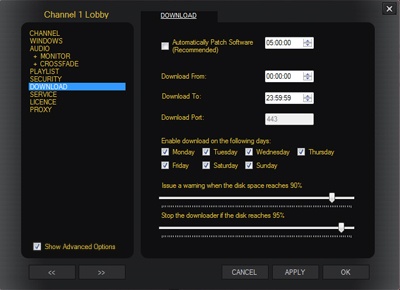
Download Options
The downloader can be scheduled for certain days or times of day. Adjust the controls
as appropriate. You may also set the downloader to stop if the disk space becomes full
by adjusting the controls.
Automatically Patch Software - This setting ensures that at the set time of the
day, your Download Player automatically checks to see if any updates have been made to the
software and if it finds any, they are downloaded and installed. This is highly
recommended, as it ensures that your Download Player is kept up to date and that you
have the very best version of the player available.
Download From: - This setting states the earliest time of the day that you
want to allow your Download Player to download any updates to your Music Profile
(such as new tracks and playlists).
Download To: - This setting states the time of the day after which you want
to stop your Download Player from downloading any updates to your Music Profile
(such as new tracks and playlists).
Enable Download on the following Days: - Select the days that you want your
Download Player to download any updates to your Music Profile (such as new tracks
and playlists).
Issue a warning when the disk space reaches X% - Allows you to set how full
you want your hard drive to be allowed to get, before the Download Player warns you
that the hard drive is filling up.
Stop the downloader if the disk reaches X% - Allows you to set how full
you want your hard drive to be allowed to get, before the Download Player stops
downloading tracks to your PC's hard drive.
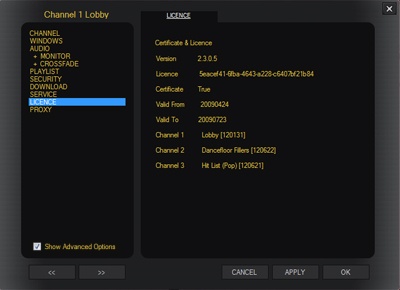
Licence Information
This section displays your Download Player Certificate and Licence Information
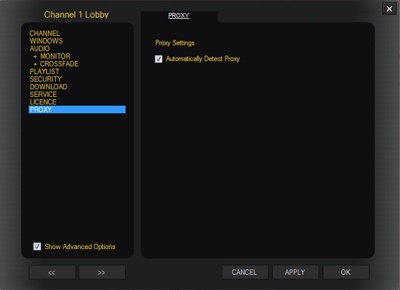
Proxy Options
If you have a Download Player which is set to check into a Proxy Server, rather than
it's default server, then the proxy settings must be configured in this section.
Automatically Detect Proxy - It is not normal practice to un-tick this box,
but doing so will allow you to enter the details of the proxy server that you Download
Player will use to check in to.
Proxy Server - This is where the IP Address of the Proxy Server is entered.
Port - This is the port number that the Proxy Server expects the Download Player to communicate on.
User Name - The user name that the Download Player can use to access the Proxy Server.
Domain - The domain that the user provided above belongs to.
Password - The password associated with the user (above).