Using the Application
Quick Links
Channel Selection
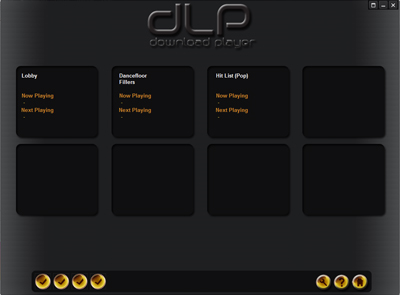
The channel selection screen displays all the channels loaded on the system and
what is playing now and next. The screen also has four system checks in the bottom
left represented by ticks or crosses. If you hover the mouse cursor over each of
them it will display a brief summary of internet status, player status, download
status and disk space status. All four status symbols should be ticked during normal
operation, if any of them are crosses, see the FAQ section.

System service is working correctly, hover the mouse
over the icon to display more details
There is a problem, hover the mouse over the icon to
display more details. If problems persist See Trouble Shooting guide.
Skip to the previous page of channels.
Note: On system with 8 channels or less this button is hidden.
Skip to the next page of channels.
Note: On system with 8 channels or less this button is hidden.
Click to view the options screen where you can change
how the system operates. See Options Pages.
Opens the windows default internet browser and redirects
you to the help website.
Opens the windows default internet browser and redirects
you to the main web pages for you to log in.
Channel Interaction
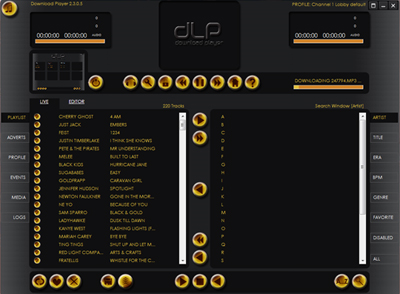
The channel interaction screen consists of two players displayed at the top left and
right of the screen. The players display what is currently playing and what is to play
next. Below are the main player controls from left to right.

Exit the application, you'll be prompted for confirmation,
then all channels and downloads will stop.
Once you have started to preview a track on your headphones
(by right clicking on the track and selecting 'Preview on Headphones' this button will
present you with a menu to allow you to 'Pause' the playback of the track on the headphones
and 'Resume' it playing again.
Click to view the options screen where you can change
how the system operates. See Options Pages.
Lock the application, the system will return the to
channel screen and if a password is set, the next user will be prompted for a password.
The passwords can be set in the options screen.
Skip to the previous track, if the track doesn't exist
on the system, a message will appear asking you to wait for it to be downloaded.
Pause the current channel.
Skip to the next track, if the track doesn't exist
on the system, a message will appear asking you to wait for it to be downloaded.
Opens the windows default internet browser and
directs it to the main web pages for you to log in.
Opens the windows default internet browser and
redirects you to the help.
Shuffle the current Playlist, either Live or Editor.
Add the selected track to your favourites list; favourites
can be easily played by using the library selection. Click again to remove it from favourites
Add the selected track to the disabled list; disabled
tracks can be easily viewed in the library selection window. Click again to enable the
selected track.
Save the currently selected playlist to a file for later.
Load previously saved playlist into the current window,
either editor or live.
Expand the Playlist Window to show more details.
Return the windows to default Mixed Mode as shown in the diagram.
Expand the Library Windows to show more details.
If you have tracks visible in the Search Window, selecting
this button will present you with a menu that will allow you to sort the tracks by Artist,
Title, Era, Genre or Beats Per Minute (BPM).
Search the library using the current selection. Please note
more than one item maybe selected by using the CTRL key. Double clicking on the item in
the library window also searches the database.
Playlist
The playlist window displays the current music playlist being used by the system. In
normal operation the music player will select the correct playlist based on the time table
specified by the management system. This allow the music to be changed throughout the day
or night. User playlists or special event playlist may also be played at any time by the
user, to return to the time tabled playlists, please right click on the window and select
return to time table.
Advertising
The advert playlist contains the current adverts for the day displaying the playtime and
type. There are two types of playlists, normal and timed, normal adverts will be played
throughout the day and inserted as a best fit between music tracks. Timed adverts will play
on time and interrupt the music.
Profile / Timetable
The profile or time table tells the system which music playlist to play and when, you may
change the playlist and jump to any of the timetabled playlist if you wish. To return to the
timetabled playlists, simply right click and select return to timetable.
Events
Events are special playlists designed by your music supplier to be played as and when you
wish, to play a special event simple click on it and select play now. To return to the
timetabled playlists simply click on the events or playlist window and select return to
timetable.
Media & Downloads
The media button displays the current track library for the selected channel and shows
which tracks have been downloaded. An overall percentage is also displayed.
Messages
Messages are logged for each channel to show what was played and when.
Searching the Library
The music library for the current channel can be searched in a number of ways:
All Artists (Displayed as A to Z) will be displayed. You can select a single letter by
double clicking; or using the CTRL (control) key select multiple letter; or use the mouse
by clicking left, holding and dragging over the required ones to highlight, then click
the search button.
All Titles (Displayed as A to Z) will be displayed. You can select a single letter by
double clicking; or using the CTRL (control) key select multiple letter; or use the mouse
by clicking left, holding and dragging over the required ones to highlight, then click
the search button.
All ERAs (Year the track was published) will be displayed. You can select a single ERA by
double clicking; or using the CTRL (control) key select multiple ERAs; or use the mouse by
clicking left, holding and dragging over the required ones to highlight, then click the
search button.
All Beats Per Minute (BPM) will be displayed. You can select a single BPM by double
clicking; or using the CTRL (control) key select multiple BPMs; or use the mouse by clicking
left, holding and dragging over the required ones to highlight, then click the search button.
All genres or music styles will be displayed. You can select a single genre by double
clicking; or using the CTRL (control) key select multiple genres; or use the mouse by clicking
left, holding and dragging over the required ones to highlight, then click the search button.
All favourite tracks are displayed.
All disabled tracks are displayed.
All tracks are displayed.