How To: Run A CD/DVD Media Update
Disc Selection
Your offline DLP update pack will contain at least one disc, used to install
the DLP software, the music, playlists and any other media as well as activating
your DLP.
Please ensure, if your update has more than one disc, that you load each disc in
turn and in the correct order. Each disc is labelled with a name and the number of
the disc.
Pre-Requisites - Windows Vista Users Only
If your computer is running any version of Windows Vista, you may find that in
order for this update to run successfully, you will need to turn off User Account
Control (UAC) on the user that you log onto the computer with.
 View How To do this
-
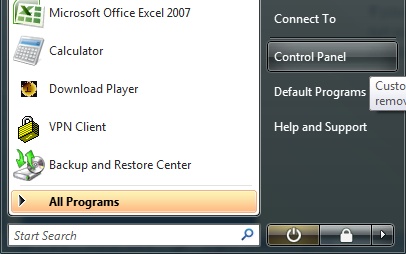
Access the Control Panel - This can be accessed by clicking the start
button in the bottom left of the desktop and then selecting Control Panel.
-
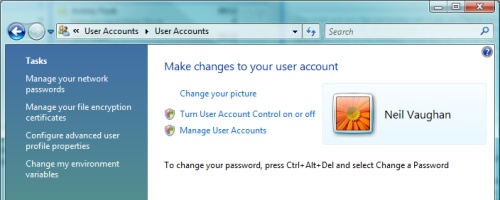
When the Control Panel opens, select the User Accounts. Depending on
your settings, you may be presented with another page now which has a User
Accounts option. If so, select User Accounts again.
-
This will open up the “Make changes to your account” page.
-
From this page, select the Turn User Account Control on or off option.
This will take you to the “Turn on User Account Control (UAC) to make your
computer more secure” page.

Make sure that the tick box is NOT ticked and then press the Ok button.
You must now re-start your computer.
Once your computer re-loads, you can start your DLP installation/update.
Download Player Installation
Now you are ready to put the media onto your player:
 View How To do this
-
Load the first disc into the disc drive of the relevant PC.
When you do this the DLP Media Update program should load automatically
(after a short while). This will only happen if your PC's auto-run settings
are set to allow this to happen. If this does not happen, browse to your PC’s
“My Computer” folder and double click the disc (CD/DVD) drive that you entered
the disc into.
Note: The file that should be loaded on the disc is the one named
“Autorun.exe”.
Note: Although all of the steps of the installation are shown below, your
installation may complete some of the steps automatically for you.
-
When the program loads (see figure 2.0), it determines if you need the latest
version of the DLP installing.
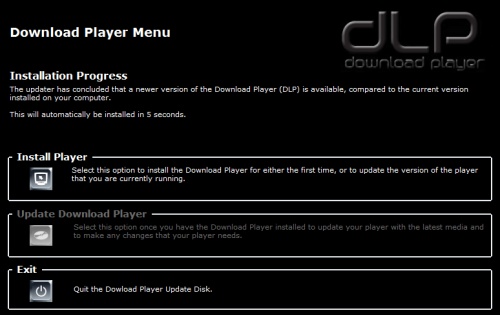
Figure 2.0
-
If you have not got the latest version of the DLP installed, the update will
now take you through the process of installing it.
If you have already got the latest version installed, you will be informed
at this stage. If this happens, skip to step 12. You may still have to
verify your player as shown in steps 6-10.
-
After a few seconds, the update program will automatically select the
“Install Player” option for you, from the menu. Alternatively, you may select
it yourself; if you do not want to wait for the countdown to reach 0 seconds
(see figure 2.0).
The following window will then open (see figure 2.1), displaying the terms and
conditions of installing the DLP. If you agree with these terms and conditions,
select the “I Agree” button to continue.
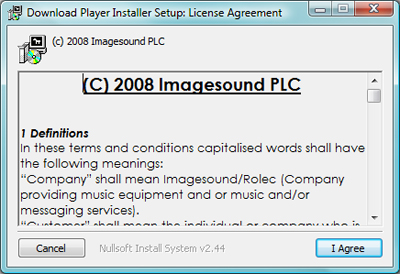
Figure 2.1
-
The next window that appears (see figure 2.2) allows you to select the location
on your PC that you would like the Download Player to be installed. By default this is
within the Program Files folder on the computers C drive, but you may
install the player wherever best suits you.
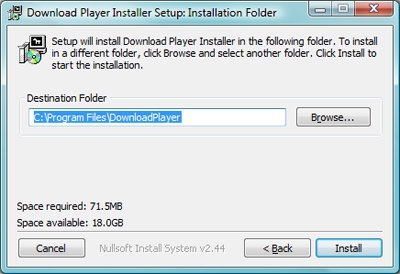
Figure 2.2
Please ensure that the drive you select has at least 5 GB of free space for you
music downloads to be stored on.
If you have a multi-channel player, please ensure you have 5 GB of space per
music channel/zone (i.e. if your player has 3 zones, up to 15 GB of free space will
be needed).
Select the desired location to install your DLP to and press the
“Install” button.
-
After a couple of minutes of installation, a message will appear (see
figure 2.3), providing you with a phone number to contact us to validate your
player. Please be patient and wait for this message to appear.
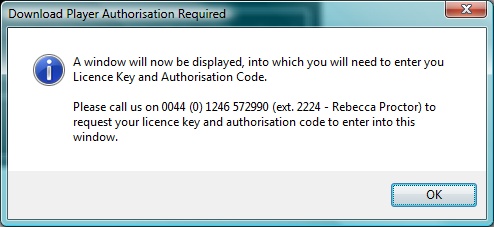
Figure 2.3
Select Ok.
-
A new window will open asking you to enter a licence key and pin code for
your player (see figure 2.4).
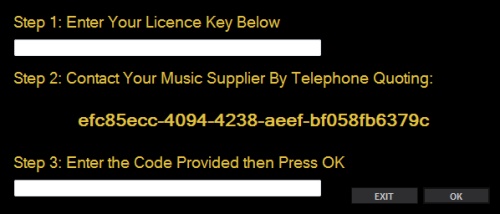
Figure 2.4
-
You will now need to call us to get these details. During this phone call
you will need to provide us with the reference code; shown in step 2 of figure 2.4.
Note: If your licence key is already filled in when this screen appears,
please just verify that it is correct when you get through to us on the phone.
Once you have entered the licence key and pin code we provide you with, press
the “OK” button.
-
The Installation Progress message at the top of the update program’s menu
will say that your player has been authorised successfully (see figure 2.5).
Your update will now count down to executing the next step of the update;
this is the “Update Download Player” option from the menu, which
installs your media and playlists.
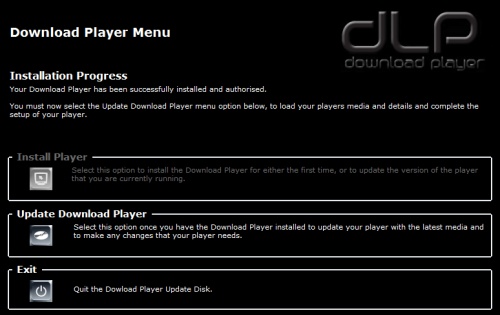
Figure 2.5
-
The installation of your media and playlists will now execute. This will take
around 5 minutes, but may be a little faster or slower, depending on the size of
your update.

Figure 2.6
-
If your update has multiple discs, then during this process you will be asked
to take out the current disc and insert the next one. Please do as instructed
in this message.
Please make sure that you insert the discs in the correct order.
-
Once your update has completed, a message box may pop up (figure 2.7)
asking if you want to view the logs of the update. If it does, just select
“No” (unless you wanted to view them; Note: If you do view the logs, you
will need to press the “Exit” button once you have finished for your DLP to
start).

Figure 2.7
Your download player should now automatically start. If this does not happen
within a few minutes, double-click on the Download player icon that has been added
to your desktop.
-
If you have a single channel/zone player, your music playback should begin
instantly, if this happens, this is the end of the installation and you can remove
the update disc.
If music playback does not happen automatically, or if you have a
multi-channel/multi-zone player, you will need to set which sound card you want each
channel/zone on your player to use to playback the music (see
How To: Set Up A Sound Card).